Powered By Blogger
Showing posts with label buildings. Show all posts

Tuesday, April 23, 2019

More 3D printed buildings

A few more pictures of recently printed objects...

This is what happens when you forget to scale your crater...

A trio of cooling towers (ran out of gray filament part way through...)

4 medium sized buildings printed at once

And these four are done!

More realistically sized craters.

Size comparison

Thursday, April 11, 2019

3D Printed Nuclear Cooling Towers

I printed a couple of larger buildings for Ogre Miniatures use. These are cooling towers like you see near nuclear power plants. About 5.5 hours to print one of these. It uses 55 grams of filament, about $0.77.


Wednesday, April 10, 2019

More 3D Printer Tests and Figuring Things Out...

OK, I've been printing a bunch of stuff out on the new 3D printer, getting the bugs out. I realized instead of printing multi-part items one section at a time, I could put multiple objects into Cura, orient them so there is no overlap, and print them all at once. Elapsed time to print these 4 parts: 4 hours.


Monday, April 8, 2019

Finally bought a 3D Printer!


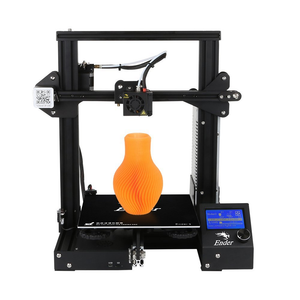
Well, after watching the prices drop through the floor, I took the plunge and purchased a 3D printer. I chose the Creality Ender 3, which had amazing reviews and seemed pretty bulletproof. Assembly was pretty simple, and the test print came out great after a few minor adjustments.


Creality3D Ender-3 3D Printer Economic Ender DIY KITS
Stock photo of Ender-3


I also sponsored a recent Kickstarter for some Sci-Fi building files, that should be perfect for Ogre miniatures play.


https://www.kickstarter.com/projects/1555279928/3d-printable-sci-fi-buildings-for-tabletop-wargame/posts/2471835

These are sized for 15mm gaming, but I can scale them to 40% and print them for Ogre Miniatures. I'm looking forward to printing a whole city of these...

First attempt at a building (this is #1 of 4 parts):


Saturday, July 6, 2013

Ogre at Origins 2013

It's been a really long time since I posted anything on here, life has a way of getting in the way sometimes. Between work, family, etc. there has just not been a lot of time for posting. However, I have been working on Ogre Miniatures projects when I could find the time.

I made it to Origins this year, and I got to play Ogre 6e against Steve Jackson! Well sort of, anyway.

On Wednesday Steve played a simultaneous game against 12 opponents in a room near the food court. They had a preliminary copy of Ogre 6e there for us to look at:


I took some pictures with my son (age 9) for scale:


I was watching from the spectator area, and the Ogre Line Editor (Daniel) asked me to assist one of the players (a 12 year old girl named Lily) who had never played Ogre before.


I advised Lily, and she played very well, and had some really lucky die rolls early in the game. She removed all of the Ogres weapons while Steve was still 8 or 9 hexes away from the Command Post.
Unfortunately the dice failed her when she started shooting at the treads, and Steve rolled over her Command Post before she could stop him. It was very close.
Steve Jackson Games put an Ogre 6e promo on the back of the Origins coupon book this year, I snagged a few for myself and other Ogre fans.


I spent some money in the Origins dealer room on new buildings for Ogre, as well as a couple of Iron Wind Metals' BattleTech dropships. These will work well as targets I think.


Now I just need to get them painted!

Monday, April 4, 2011

Cheap Ogre Buildings Part II

I finally got busy and finished my PVC pipe buildings for Ogre.  After some sanding and a couple of coats of primer, I decided to go with a khaki color to try and simulate concrete buildings. I made up some signs, doors, and windows in Microsoft Visio and printed them out on a color laser printer.


I used some "peel and stick" paper left over from another project to print them on, so all I had to do was stick them to the buildings.


At this scale, doors and windows are pretty much "painted on" anyway.


I probably should have made the Weapons Testing building look damaged in some way, oh well, I still have plenty of PVC left...


They're a little too "clean" for Ogre, I'll have to airbrush some weathering on them.

Monday, September 27, 2010

Another cheap Ogre buildings project

In my seemingly endless pursuit of 1/300 scale (6mm) buildings for my Ogre and Battletech games, I have started yet another project using easily obtained materials.

I had been considering the construction of some "Quonset hut" looking buildings for a while, and during a trip to Lowe's I had an inspiration in the plumbing aisle. There was a display of PVC pipe, pre-cut in 2' lengths.

I picked one up and looked it over and thought "If I sliced this lengthwise and capped the ends, it would look like a Quonset hut/aircraft hangar".

So I bought some.

PVC pipe is sized by the internal diameter (for example, 2"), so the outside diameter is always somewhat larger. I bought three 2' sections in 3 different sizes: 2.5 (2.875")", 3" (3.5"), and 4" (4.5").

 I figure the largest size will be an Ogre factory/garage, since it scales out to be about 112' wide. I have an idea in the back of my head about an Ogre "assembly line" with multiple buildings in line with one another.

After getting them home I had a moment's hesitation about how I was going to cut them lengthwise, a bandsaw seemed like the best option, but I don't own one. Luckily a coworker of mine does have one, and he zipped them all in half for me. I used my power miter saw to chop them off into suitable lengths, and then sanded down the rough edges.

In my materials storage area I had a couple of large plastic sheets that I scrounged from somewhere, they were white and about 4' square and maybe 1/8" thick. I scored a line down one sheet and snapped off a piece for testing.

I knew from some past experiences that PVC pipe can be hard to glue, you can't glue it with epoxy, superglue, PVA, or anything else the average modeler has on his workbench. In plumbing they use a purple glue and a special cleaner to make the joints watertight.

I visited Lowe's again, and discovered they offer a glue for sticking PVC to almost all other plastics. The glue really stinks, be sure to use it in a well-ventilated area, but it stuck my test pieces together so well that the plastic failed before the glue joint.

I cut some appropriately sized rectangles out of the plastic and glued all of the ends on at once, to minimize the number of times I had to open the glue can. I was undecided on doors/windows, whether to cut them out or paint them on, so I left the ends solid for now.


After letting them dry for 24 hours or so, I used my Dremel tool with a cutoff disk to remove most of the excess plastic, then sanded the remainder using the Dremel and some sandpaper. You have to sand slowly to keep the plastic from heating up and melting though. I used some fine sandpaper to go over the pipe surfaces so the primer would hopefully adhere a bit better.


I used a light coat of gray primer to bring out any defects so I could sand them out, then primed them again when I was satisfied with the finish.


The next step will be to work out the door and window options, and then get them painted.

Friday, August 28, 2009

1/300 Sci-Fi Buildings from Scratch (well almost)

I attended Origins in Columbus this year (as i do every year), and noticed a fairly nice looking city table that Reaper had set up for CAV2. On that table there were a lot of paper buildings, and a couple made from something that looked familiar...


Now where have we seen these before...?


Plastic electrical boxes! Now how come I never thought of that before? Easily available at local big box home improvement stores and cheap too.


I did some price comparisons and found there was virtually no difference in price at any of the major stores. So I bought a few to experiment with. The small 2 bay boxes pictured above were $1.86 each. I also found a few useful items in the plastic plumbing aisle.


Step One - Remove the nails with a pair of pliers, they just pull right out.


Step Two - Remove the bar code sticker. This was easily accomplished with the application of a little heat from a hair dryer and a #11 X-acto blade.


Step Three - Remove the "wings" along the sides. I use a dremel tool with a cutoff wheel at low speed to carve the wings off and smooth the remaining areas. I used some fine sandpaper as well.


I decided to open one end of this one up and turn it into an Ogre "garage". A couple of razor saw cuts vertically...


...and then snap the door piece off and clean it up. I reglued it in the open position with some gap-filling superglue.


A quick primer coat of white to show any defects...


Hmmm... roof looks kind of plain. How about a ventilator from my bits box?


A couple coats of "stone" spray paint and some cardstock solar panels that I ran off on the color laser printer...


And that's it.